AngusNOW
Your Live Animal Registration System
AngusNOW provides you with the tools to register animals, enter calving data, enter weights, transfer animals and much more from the comfort of your home! With AngusNOW you can receive registration numbers and transfer ownership instantly – no more waiting for your information to be processed.
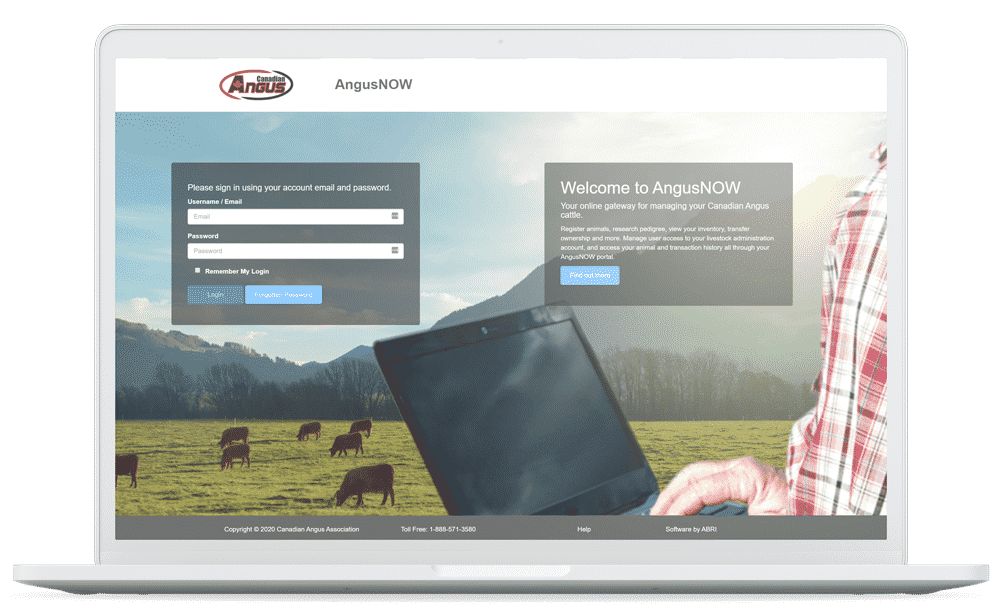
Don't have an AngusNOW account?
Please contact your Canadian Angus Association to sign up for this service. You will be unable to access AngusNOW until the office has set it up for you*.
* Must have Canadian Angus email address and membership must be current.
Email or 1-888-571-3580
Once you have your account set up by the office you will receive an email inviting you to create an account and password.
Please bookmark the website for future access.
When you create your account, your username will be your email address, and you will need to create a password that includes one capital letter, a number, and a special character (!&*$)
To print off step-by-step instructions of how to use AngusNOW click HERE for English and click HERE for French.
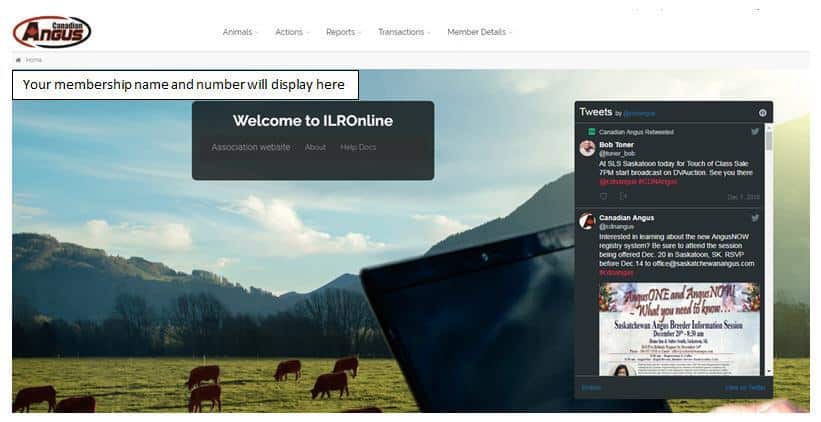
Once you are logged in you will see the landing page (below)
Instructions:
Getting Set Up
1. Please contact the Association to sign up for this service via email or 1-888-571-3580. You will be unable to access AngusNOW until the office has set it up for you.
- NOTE: you must have a valid email address for this service, your membership fees must be up to date and you must not have an overdue account, in order to be set up for this program.
- Once your account is set up by the office you will receive an email inviting you to create an account and password. The email will have these details:
This email is part of the process to set you up as a user in the new AngusNOW system. AngusNOW is the web application you may use to access your registry data for Canadian Angus Association.
You will be granted access in AngusNOW to:
Member: MEMBER NAME Member ID: MEMBER ID NUMBER
Please click this https://namerica.ilronline.com/web/cang/memberlanding within the next 30 days to set up your account and to confirm access to the above user (it should take less than a minute). New users will need to create a password and confirm a few details before your account is activated and ready to use.
Note: Your username in the new system will be this email address we have contacted you on.
For security reasons the link above expires in 30 days. After 30 days you will need to contact registry@cdnangus.ca to resend the link.
***Please bookmark the website or put into a folder for easy access in the future.
c. CREATING ACCOUNT — When creating your account your username will be your email address, and you will need to create a password that includes one capital letter, a number, and a special character (! & * $).
d. When logging in, ensure that your Pop-up Blocker is turned off. If it is on, when you click “HERE” from our website the login page will not open for you. You will know your Pop-up Blocker is on because the screen will be blank and you will see a small red X in the right hand side of your browser (where you see the website’s URL). If you see this x, right click and turn off the pop-up blocker to allow access to our site.
e. If you have multiple memberships using the same email address you will need to signup with the link for the first member. Please sign out after you have the first membership setup. Then click on the second link for the next membership and repeat the process. When you go to login at a later date with your email it will ask which membership you want to work under, select the one you wish to use. Note: registrations must be done under each individual member whereas weights can be entered from the Primary membership if linked for performance.
2. Forgot your password — if you already have an account, click https://namerica.ilronline.com/web/cang/memberlanding to log in. If you forgot your password enter your email address in user name then click on the blue “Forgotten Password” button on the login screen. This will send you a link to reset your password. When you reset your password remember that your password must include one capital letter, a number, and a special character (! & * $). We cannot reset your password.
3. PLEASE NOTE: If you have an OVERDUE outstanding balance on your account, you will not be able to log in to AngusNOW. Phone us at 403-571-3580 to provide a credit card or send an e-transfer to Alan Yuen at ayuen@cdnangus.ca to clear up your outstanding balance. Use your account number as password and reference for etransfer. Once we have received and processed your payment you will be able to access AngusNOW.
4. Once you are logged in you will see the landing page (below):
5. From the landing page you can navigate to:
- Animals
– Actions (this is a good time to populate your lists so all animals and buyers are available for your transactions)
– To do this select one of the lists - Male List
- Female List
- Buyers/Sellers List
- Hit the Clear & Repopulate Button OR the Repopulate button – this will update the selected lists to ensure your animals listed are accurate and will prepopulate your Buyers/Sellers list from the last three years.
- Reports
- Transactions
- Member Details
- Animals
6. Animals
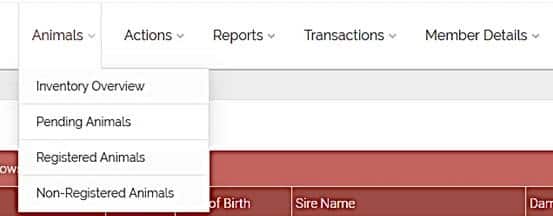
- Under the “Animals” tab you can view:

- Inventory Overview – Use this tab to dispose and register animals, and add weights
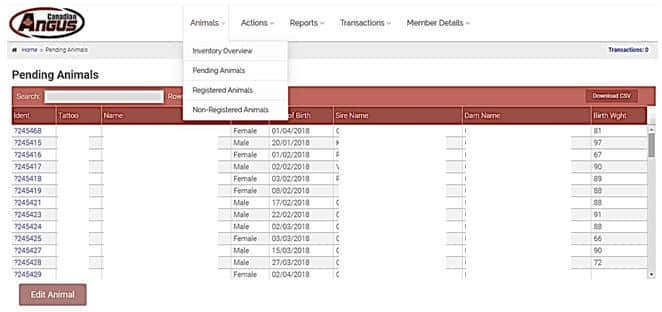
- Pending Animals – Use this tab to view animals that are waiting to be registered
- Registered Animals – View your registered ACTIVE animals (can do disposals here)
- Non-Registered Animals – View your unregistered ACTIVE animals (can also do disposals here)
- Under the “Animals” tab you can view:
7. Reports/Lists of animals
- Under the “Animals” tab chose either pending animals, Registered animals or non registered animals to run a list for them.
- Once you see the list go to the Download CSV (top right corner adjacent to the search bar).
- Select download CSV.
- It will show the download at the bottom of the screen. Once the file is downloaded you can click on the file and then choose to format, save or manipulate for your own purposes.
Inventory Overview
Register calves, add weights, dispose animals
1. Under your Inventory Overview you can view your herd inventory, number of progeny, and select data by year.
2. Click on the number in the “Cow Inventory” column to view your herd inventory for that year and calving season.

3. After clicking on “Cow Inventory” you will be able to see all the cows for that calving season, and be able to update your calving information (see below).

4. Using the search bar is a fast and efficient way of locating animals in your animal lists. The search bar is located beneath the Incomplete and Complete tabs. If you type in your search criteria any animal that has that specific criterion in their ID number, tattoo, or name will appear. For example, if you type in “78” animal 12345678, CAA 12A Miss Cow 278C, and XXX 78C would appear in your list.

PLEASE NOTE: When working in your inventory to register animals, submit weights, dispose of animals, etc. do not click on the “Ident” number when selecting a row. The ID number is a blue colour because it is a hyperlink. If you click on this, it will take you to another page with the overview of the animal. You want to click on the name, tattoo, etc. of the animal you want to select. You will know you have completed this as the animal’s row is now a light blue/gray shaded area. Clicking on the box itself will also not get you anywhere.
5. REGISTERING AN ANIMAL
Click on the LINE of the cow you would like to register a calf from so that it is highlighted BLUE/GREY. You can also type in the registration number or tattoo in the box (not name) to find an animal.
a. Then click on “register calf” located on the bottom left-hand side.

b. Once you have done this a page allowing you to register the calf will appear (see below).
c. Enter the appropriate information for the calf that you are registering.
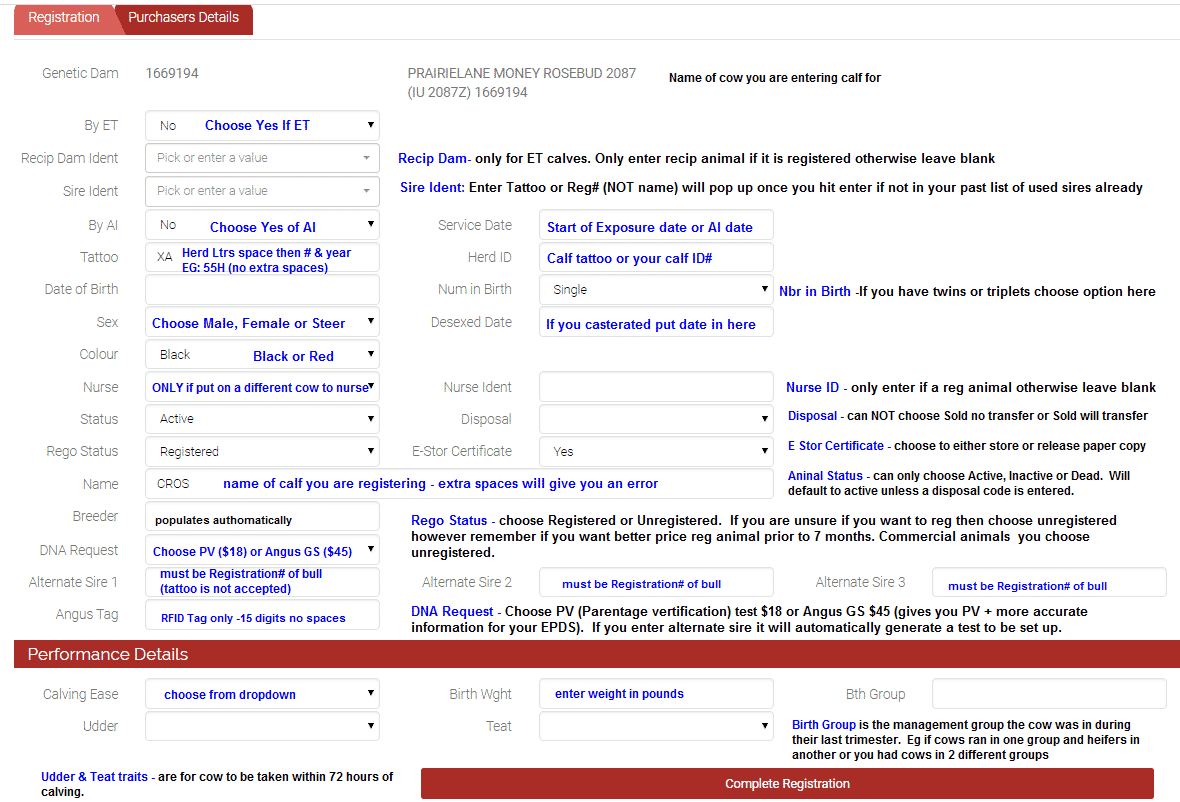

6. ANGUS TAG — This feature is no longer available because CAA does not have access to the groups of Angus Tag (RFID Tag) you receive from CCIA.
7. ET CALF — Choose YES for ET if the animal was born from Embryo Transplant The option to record recipient dam and nurse cow are also available. Only record these if it is an animal in the Canadian Angus herd book.
8. Red Carrier field is no longer available to enter information. If it comes up with a warning you can submit the animal and the office staff will fix accordingly.
9. When recording a twin ensure you select multiple birth (2), not single in the Number in Birth field.
a. When recording the second twin you will need to click on Animals, Register Animals at the top of the screen and select the dam and enter all information. Once the second twin is submitted then return to step 5 above.
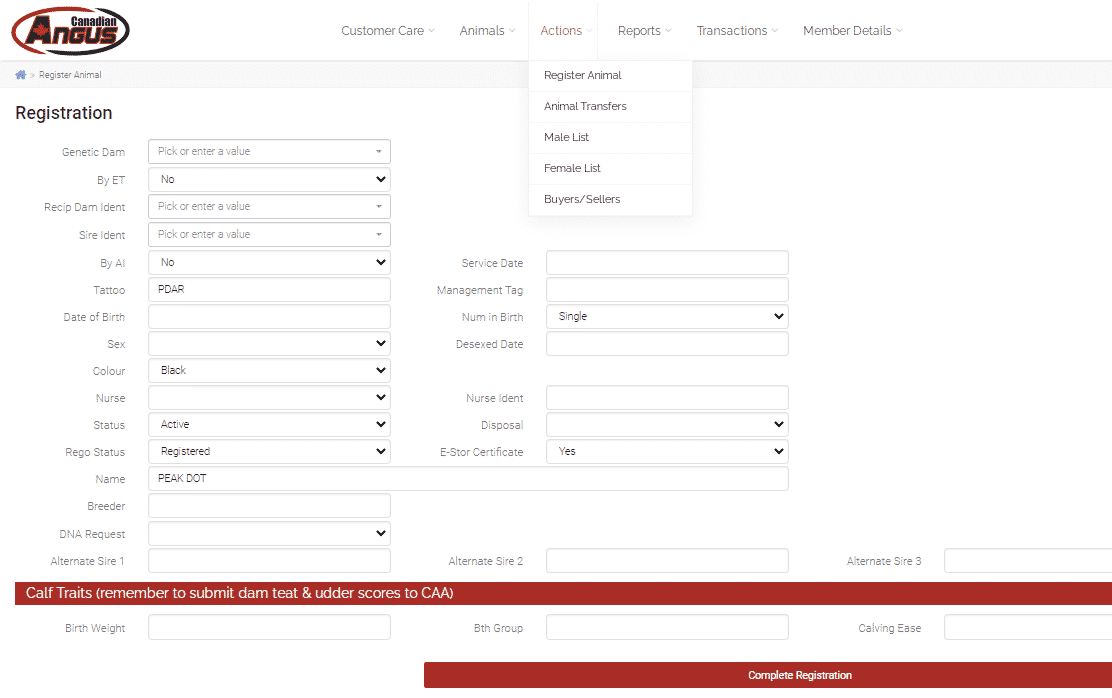
10. Service Sires — If your bull list is missing bulls you normally register calves from, go to the Action tab and select your Male List, click on Clear and Re-Populate List and that will update your list to include any bulls you have used in the last three years. If you have not used this bull as a sire in the past you will need to type in the registration number or tattoo in the box (not name) to find an animal. You will see the bull come up in a box below the field. You will need to click on it in order for it to populate the name and information.
11. Parent Verification — Multiple sires – If you have a cow that was exposed to more than one bull you have the option to choose DNA request (either Parentage Verification (PV) or Angus GS). Enter in the alternate sires you would like to test against. The test will automatically be set up and you will be charged and sent the paperwork upon closing the work order. You can also choose to do a PV or Angus GS test without alternate sires if you want to verify parentage on the calf for your own information. Make sure you enter tattoo or reg # of the sires.
Setting up tests after registration: Currently members can only set up parentage verification (PV) or AngusGS (GS) tests at the time of recording your animals. If you require a PV, Angus GS, or a genetic condition test for any animal AFTER it is recorded, please contact Member Service or call 1-888-571-3580 to set up this testing.
PLEASE NOTE: If you submit your samples to the lab without the appropriate paperwork to accompany the samples you will be charged an additional fee of $54/sample. The lab must receive the electronic request for those animals BEFORE the DNA arrives at the lab. If DNA samples are sent to the lab without a copy of the paperwork request extra fees will apply.
12. Once you have entered all the relevant information for the calf, click COMPLETE REGISTRATION. You will see a message indicating the success of the registration. You will see a GREEN BAR at the top indicating everything is good and the animal will either have a registration number (seven digit) or commercial number (CM number).
ERRORS & WARNINGS — If you see a RED BAR at the top, it means that there are errors or warnings on the animal. You will need to fix these errors and warnings before you can complete the recording of the animal. If you are not able to fix these errors and warnings at this time, click the “SUBMIT AS PENDING” red button. This will push the animal through as a pending animal. Staff will fix the error if possible and if not it will be assigned a pending ID number (? followed by six digits). If you don’t hit the “Submit as pending” button at this time the information on this calf will not be submitted and all information you have entered will be lost if you move to another screen.
Most errors on animals in AngusNOW are fixable. Go into your pending transactions or pending animals and click on an animal. The error message will show up in colour at the top of the screen. If you can change some information, click Edit Animal and make the necessary corrections. If you cannot fix your error, send an email with the necessary information and we will be happy to help or you can submit and it will get fixed from the daily report we run.
13. Once you are done registering your calves, you should have no females listed in the incomplete tab. You can click on the “Complete” tab in Cow Inventory to view the updated status of your animals.

14. Always remember AngusNOW is live. When you select “Register Now” the animal is instantly registered and your account is charged immediately.
15. Once you have registered your calves, proceed to Pending Transactions (located under the Transactions tab) to pay for and complete the process of registration. Try to close your work orders weekly to ensure that you get any RFIs or DNA paperwork right away.
Pending Animals
- The Pending Animals tab tells you what animals are not registered.
- Any animal with a ? followed by six digits is NOT REGISTERED.
- To register a pending animal, you must click on the animal and update the required information. If you cannot fix the errors then email and ask us to complete them.
Entering Weights
- While in your “Inventory Overview” click on the weight (BW,WW,YW) that you would like to enter. Click directly on the number in the box.

2. A new screen will appear that have information about the calves born in that season – in this case, because we have selected Weaning Weight (WW) for Spring 2018 the appropriate information will appear.
3. Ensure that you are in the “Incomplete” tab.
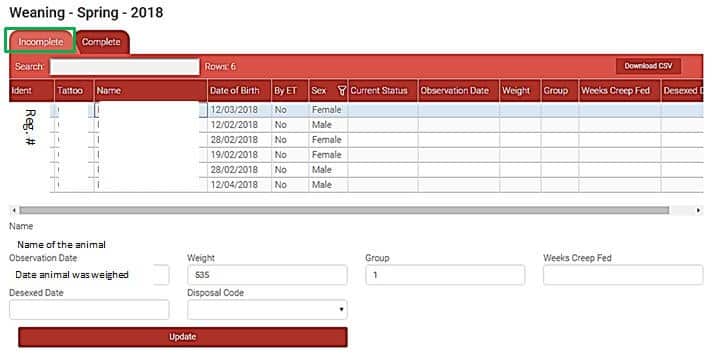
4. Select the animal that you want to enter information for (in this case we have selected the top one which is why it is blue). Do not click on the blue underlined identification, you must click on the line itself.
5. Enter the information you wish to provide (weight, desexing date, disposal code, weeks creep fed, group).
6. When entering weight information and/or a fate/disposal code, a date must be provided. If no date is provided, you cannot enter the corresponding information until one is entered.
7. The “Group” is the management group your calves were in between birth and weaning. For example, cows run in two separate herds for the months before calves are weaned you would have Groups of 1 and 2. You MUST enter this value.
8. Click “Update”
- The information for that animal is now complete
9. AFTER YOU HAVE SUBMITTED WEIGHTS REMEMBER TO RUN YOUR REPORTS. If you don’t run your reports, you will not get your Birth Reports, Weaning Reports, or Yearling Reports, or your updated EPDs or adjusted weights. If you do not receive the reports after submitting the request but you receive a Herd Inventory or Weaning/Yearling Weight Worksheet with “Missing Data” on the side this means you are missing data at that particular level. You must submit information for the animals indicated before you are considered compliant and are able to obtain your reports.
Disposals
- To Dispose of an animal go to either Registered OR Non-Registered animals.
PLEASE NOTE: you cannot dispose of pending animals. You must email registry in order to dispose of them.
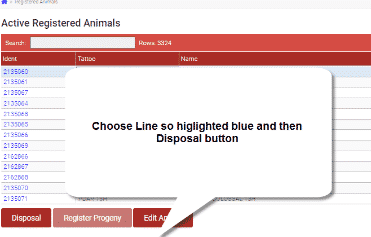
2. Click on the LINE of the cow/calf you would like to dispose so that it is highlighted BLUE/GREY. You can also type in the registration number or tattoo in the box (not name) to find an animal.
3. Once you have the line highlighted you have the option of Disposal. Click on Disposal button.
4. Choose Action from the drop-down list
5. Choose Disposal date. If you are disposing of cows and calves, please make sure to dispose of them at the time of their removal from the herd. If you are unsure of the date, please use December 31 of the previous year. This will remove the animal from your herd in the current year and no further information (calving, weights, etc.) will be requested from you.
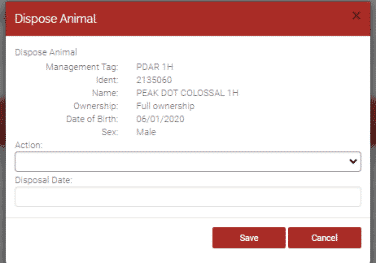
WARNING: If you dispose of animals in the current year they will still show up as missing information on the previous year which can potentially hold up performance data from running.
6. Click Save.
Recording Inventory/Reproductive Status
- Go to Cow Inventory for the season you are recording calves into.
- Choose cow by clicking on line (not on blue ident#).
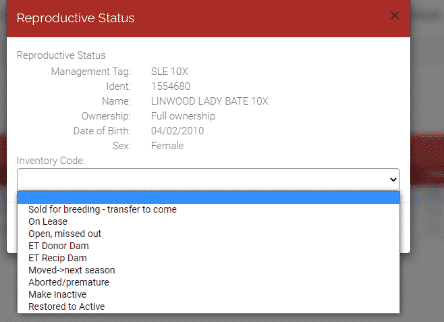
- Click on Cow Fate code (pop up box will appear).
- Choose code and click save (please note move to next season means move from Spring to Fall or Fall to Spring; it does not move them to the same season next year (Spring to Spring for example).
Run Performance Reports
RUN PERFORMANCE REPORTS (TO GET EPDS & ADJUSTED WEIGHTS UPDATED)
VERY IMPORTANT: Please note if you do not run these reports or request for the office to run them for you the EPD and adjusted weight information does not get updated for your animals after entering data at birth, weaning and yearling.
- Click on “Reports”.

2. Choose Submit a report.
3. Make a report screen choose Performance Reports.
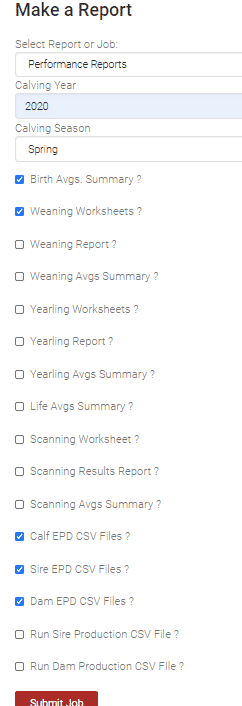
4. THE ITEMS TO SELECT for the top of the report

Selected Report or Job: Performance Report
Calving Year: the year you want reports for (e.g. 2019)
Calving Season: Spring, Summer, or Fall (select the appropriate one. If you have Spring & Fall calves, do once for the Spring and then another time for the Fall).
5. Select the type of report or job you would like to run (see below) and hit submit job.
2. Weaning Information

3. Yearling Information

4. After Scanning

Herd Inventory Reports
1. Go to reports.
2. Submit Job or report (choose owned animals CSV).

3. Choose parameters
- Registration status (registered or unregistered) if you leave blank, all will print
- Sex (male, female or steer) if you leave blank, all will print
- Animal Type (either choose one of options or leave blank to print all)
- If you have linked herds, click on include associated herds (if you want them included)
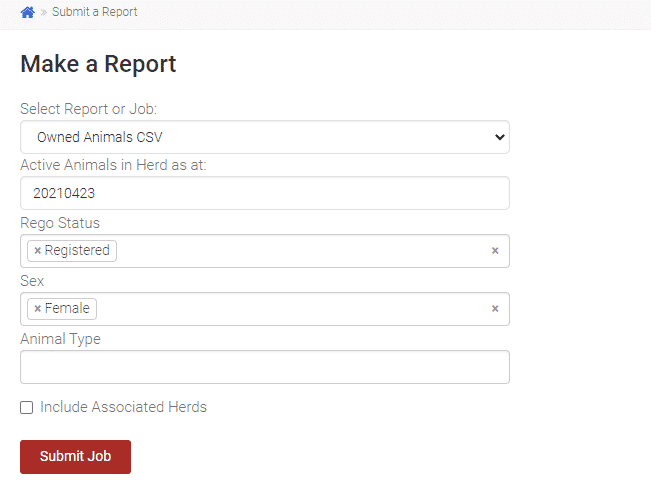
4. Submit Job.
5. Go to Reports and View jobs to see (as per below).
PLEASE NOTE: you can also run a CSV file from any of your inventory screens on pending, registered or unregistered animals by clicking on the Run CSV in the top right-hand corner as seen here.

Locating Reports
LOCATING REPORTS once ran
1. Go to Reports.
2. View Jobs and CSVs.

3. Choose AngusNOW herd reports (to view reports ran from the office choose Association reports). All reports will show up.
PLEASE NOTE: If you can see the report in submitted job and you do not see anything in AngusNOW reports, you either have missing data OR you have entered the wrong parameters.
To check for missing data please go to your inventory section and see if you have anything in the incomplete tab for calving or weaning. Yearling weights are not required so this will not be a factor.
If you are looking for reports ran by the office choose ASSOCIATION REPORTS.
The AngusNOW Certificate Re-issues is currently not available to use.
If you still cannot find why your reports are not printing, email and staff will be able to help you.
Transfer an Animal
1. Go to Actions Tab
a. Under the “Actions” tab you can view:
- Register Animal
- Animal Transfers
- Male List
- Female List
- Buyers/Sellers

b. Go to ANIMAL TRANSFERS
c. To transfer an animal, click on the “Animal Transfers” tab. The below screen will appear:
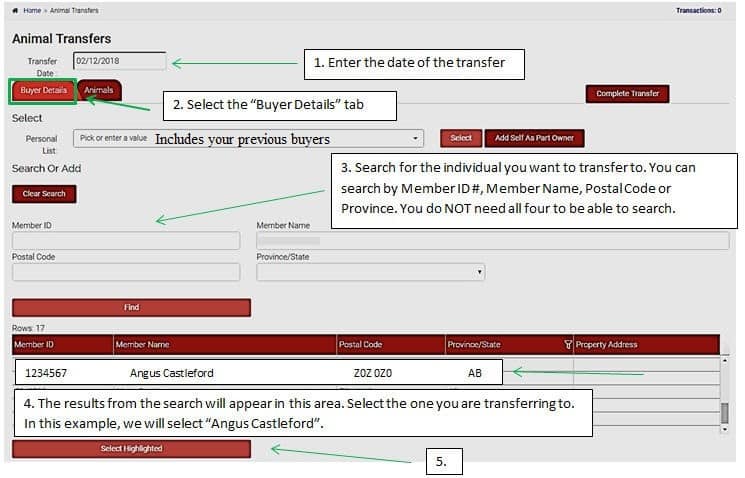
 d. When searching a member, remember less is more. You can use the Member ID if you have it. If you do not you can use % sign before and after parts of the name. This will search anything similar to the name.
EXAMPLE: Member Wrightside Ranch Lexi Wright. Try %L%wright% or %wrightside%. All probable options will come up to choose from by using this format.
If you can’t find a member in the system please contact Member Service and we will give you the member ID number or we will set up for you if they are not in the system.
This program DOES NOT currently offer the option for non-financial transfers to family members. Please continue to send non-financial transfer requests to the office for processing.
e. SELECTING BUYER — Once you have found the individual you want to transfer your animals to, click on their name, then click “Select Highlighted “ beneath the search results.
f. After selecting the person you want to transfer to, the screen will change to the below:

g. Now that you have the buyer selected that you want to transfer to, click on the “Animals” tab

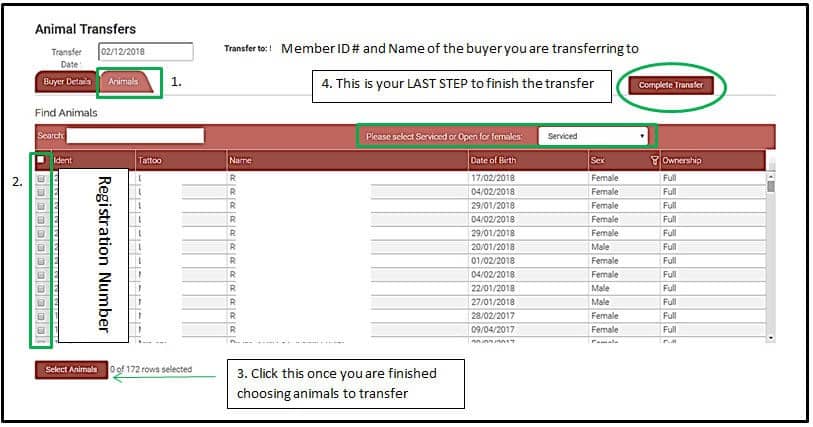
h. Choose the animal(s) that you want to transfer by clicking the square check box on the left side.
i. Once you have checked all the animals you want to transfer, press “Select Animals”.
j. If your animals have been sold as “Serviced” (meaning they are sold as bred animals) you will need to enter Service details (see below). If the bull does not show up in the list you can type in the registration number or tattoo. If you have more than two sires you will need to email registry@cdnangus.ca the information for the third sire. If they are not serviced, you can select “Complete Transfer”.

k. Once you have entered Service Details, click “Save” and then click “Complete Transfer”.
Female Exposures
Currently this feature is not available in AngusNOW. We will be offering this function in 2022.
Pending Transactions - Processing Orders
Make a payment and receive paperwork
- Processing orders — In order to receive your now-completed registrations, DNA paperwork, transfers or weights, you MUST pay for them.
- Go to the “Transactions” tab and click on “Pending Transactions”.

3. Once you click here, a page will appear with the work you have completed, and the costs (see below)

4. Click on “Pay Now”.
5. CREDIT CARDS — You will now be asked for your credit card information. Enter your information and press “Pay”. If you would like that card to be used for future transactions, click “Save this Credit Card Information for the future”.

Please note: Each time you make payment you will still need to enter your CVV code even if your card is saved in Angus NOW. When a credit card is saved in AngusNOW for security reasons the information does NOT transfer over to the office database for making payments. If you want an updated credit card on your account at the office you must call us with the information.
6. You will receive a message indicating that payment was successful.

IMPORTANT
- If you don’t close your work orders you will not receive the work you have completed (e.g. DNA paperwork, invoices and certificates).
- Always close your work orders on the 14th and 29th of each month (email reminders are also sent out to anyone with work orders open as a reminder).
IF A WORK ORDER IS LEFT OPEN WHEN WE ARE PROCESSING MID MONTH OR MONTH END THEN THE OFFICE MUST FORCE CLOSE AND TAKE PAYMENT IN ORDER TO COMPLETE OUR ACCOUNTING PROCESSES.
- Invoices are sent to your email address when the work order is completed and closed. PLEASE NOTE: Invoices cannot currently be reprinted after the initial work order has been closed. To get copies of missing invoices contact registry.


